Showing posts with label Recipe. Show all posts

Tuesday, May 23, 2017

Oven German Pancakes/Dutch Babies - Super Delicious, Inexpensive, and Easy!

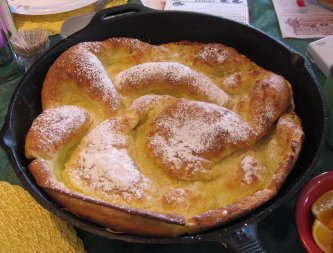
German Pancakes II Recipe
Photo Credit AllRecipes
Right now I am trying to shift from store bought easy breakfasts like cereals for my family.  Not only are they expensive, but they are highly processed with doubtful ingredients, preservatives, and GMO's!  It has been a challenge because I am NOT a morning person.  It takes me a good hour plus coffee to get up to par. Our mornings start horrifically early as our children have to be out the door by 6:45 to get to school.  Fortunately, I wake up at 5 am every morning without fail or alarm clock.  Years of breastfeeding babies have trained my internal clock to wake up like that so I usually have an hour to get primed for the morning rush.  My children do not like things that would go into a crockpot like oatmeal or cornmeal mush.  But I think I have finally found a winning recipe that not only is easy, but healthy, delicious, and filling.

The recipe, of course, is German Pancakes, also called Dutch Babies.  Could we love it because I am part Dutch :)?  This is simply a puffed oven pancake that serves a family of 6 easily.  I like it because while my coffee is brewing I simply throw the four ingredients into my mixer, melt the butter in my cast iron skillet and preheat the oven.  Then throw it in and 1/2 hour to 45 min later I have a hot filling breakfast for my children.  I love it topped with powdered sugar and berries.  It can also be topped with maple syrup, honey, molasses, stewed fruits, or plain powdered sugar. 

Because it has 6 eggs in it the protein helps my family feel full longer and helps with energy in the morning.  If I were to make just eggs and toast for breakfast we would need about 18 to feed our family.  The other reason this is a time saver for me is because while it is baking I can get on with other morning chores such as making lunches, starting laundry, and assisting the kids get ready for school.

I found the recipe on all recipes, but also have found another recipe that calls for fewer eggs if you need to stretch them and has a much more detailed instruction.  I am going to try it tomorrow.

My children absolutely LOVE these and literally have pleaded with me to make them.  Talk about a hit!  So if you're looking for an easy and healthy recipe for your family breakfasts try this one.  Click HERE to go to the Allrecipes post.  Or go HERE to see the alternative recipe for fewer eggs at a great site called Recipes From a German Grandma.  Love the name :)

Ingredients

Original recipe makes 6 servings        

1/4 cup butter


1 cup all-purpose flour


1 cup milk


6 eggs, lightly beaten


1/8 teaspoon salt


Directions

  1. Preheat oven to 350 degrees F (175 degrees C). Melt butter in a medium baking dish (best if you use cast iron).
  2. In a medium bowl, mix flour, milk, eggs and salt. Pour the mixture into the prepared baking dish.
  3. Bake on center rack in the preheated oven for 30 to 40 minutes, until golden brown.  Sprinkle with powdered sugar and serve while still warm.

Thursday, May 18, 2017

Buttermilk Blueberry Morning Cake

Lemon-Blueberry Breakfast Cake


With blueberries on sale right now I thought I would share one of my favorite recipes that use them. I have tried many blueberry quick bread, muffins, and cakes before and I have to say this one is the best.  It is moist with a light texture and the blueberries are just enough.  I only used a heaping cupful of berries instead of the two because I was using frozen ones and it turned out perfect.  I also used sour milk instead of store bought buttermilk but that's a standard substitution.  The whole family raved about it and it is definitely going to become a standard on Monday baking day.  You could use any berry or chopped fruit in this cake.  It's wonderful with coffee or tea.

Buttermilk-Blueberry Breakfast Cake

Serves 6-8

½ cup unsalted butter, room temperature
2 tsp. lemon zest or more — zest from 1 large lemon
7/8 cup* + 1 tablespoon sugar**
1 egg, room temperature
1 tsp. vanilla
2 cups flour
2 tsp. baking powder
1 tsp. kosher salt
2 cups fresh blueberries
½ cup buttermilk
* 7/8 cup = 3/4 cup + 2 tablespoons
** This 1 tablespoon is for sprinkling on top


1. Preheat the oven to 350ºF. Cream butter with lemon zest and 7/8 cup of the sugar until light and fluffy.

2. Add the egg and vanilla and beat until combined. Meanwhile, toss the blueberries with ¼ cup of flour, then whisk together the remaining flour, baking powder and salt.

3. Add the flour mixture to the batter a little at a time, alternating with the buttermilk. Fold in the blueberries.

4. Grease a 9-inch square baking pan (or something similar) with butter or coat with non-stick spray. Spread batter into pan. Sprinkle batter with remaining tablespoon of sugar. Bake for 35 minutes. Check with a toothpick for doneness. If necessary, return pan to oven for a couple of more minutes. (Note: Baking for as long as 10 minutes more might be necessary.) Let cool at least 15 minutes before serving.

Wednesday, September 18, 2013

Old Fahioned Potato Bread AKA the best dinner rolls ever


This is from my baking day.  The potato rolls are in the big square pan.

I started experimenting with bread recipes back in Wyoming (we did allot of new things in Wyoming)  when I didn't want to bother running into town for a loaf of bread.  I had never baked yeast bread before so the whole process was a great learning experience.  I used to think baking your own bread was difficult and fiddly but now I love it.  There is something so comforting about the smell of baking bread.  When my children come in from playing they sniff the air and excitedly shout "are you baking bread?".  These are also a top request from my mom for any dinner she comes to.  She calls me ahead of time and asks very sweetly if I'll have made rolls.  If I haven't threats ensue!  But this recipe is so fool proof that its a snap to make.  Totally worth it :)

This is the bread recipe that I have found produces a light and excellent textured bread no matter what.  The flavor is very good and goes great with butter and jam.  It keeps for a few days without going stale due to the potato.  But what I really love is to make it into rolls.  We try to have rolls with every dinner and this recipe makes enough to last us a weeks worth of rolls.  I put mine into a big Pyrex baking pan and find the rolls turn out better when nudged up against each other.  It takes a few more minutes to bake that way but I like them better.

The recipe comes from a book I picked up at a yard sale for the ridiculous price of $2.00.  I usually wont pay that much for a book but I really wanted this one.

Better Homes and Gardens
Old Fashioned Home Baking

Page 45

Old Fashioned Potato Bread

1 1/2 cups water
1 Medium potato, peeled and cubed
1 cup buttermilk or sour milk (make this by adding 1 tbs vinegar to the milk and let sit while the potato is boiling)  I also use just regular milk and it turns out fine but without some of the flavor
3 tbls sugar (I have used 4 tbls before, and sometimes use brown sugar to give it more flavor)
2 tbls butter
2 tsp salt
6 to 6 1/2 cups all purpose flour
2 packages active dry yeast (I use three)
all purpose flour

In a saucepan combine the water and potato.  Bring to a boil.  Cook, covered, about 12 minutes or till very tender.  Do not drain.  Mash potato in the water.  Measure water mixture and add more water to make 1 3/4 cups if necessary. Return to saucepan and add buttermilk/sourmilk, sugar, butter, and salt.  Heat or cool as necessary to 120 to 130.  In a large bowl combine 2 cups flour with the yeast and mix well.  Add liquids all at once and beat with an electric mixer on low to medium speed for 30 seconds scraping bowl.  Beat on high for 3 minutes.  Using a spoon stir in as much of the flour as you can.

On a lightly flour surface knead in enough of the remaining flour to make a moderately stiff dough that is smooth and elastic. (6 to 8 min total).  Shape into a ball. Place in a greased bowl.  turn once so that the top of the dough is covered with the fat so it wont form a skin.  Cover and let rise in a warm place till double in size (45-60 min)

Punch dough down.  Turn out onto a lightly floured surface.  Divide in half.  Cover and let rest for 10 minutes.  Lightly grease two loaf pans.  Shape each half of dough into a loaf.  Lightly dip tops of loaves in the additional all purpose flour.  Place in pans flour side up, cover and let rise till nearly doubled, about 30 min.

Bake in a 375 oven for 35 to 40 min or till done.  If necessary cover with foil the last 15 min of baking to prevent over browning.  Remove bread from pans and cool on a rack.  Makes two loaves

Rolls

Prepare as above only when shaping before second rise divide into 12 roll balls for each half of dough and lightly dip tops of balls in the flour.  Place evenly on greased baking sheets just far enough that rolls don't touch.  Cover and let rise till nearly double. About 30 min.  Bake in a 375 oven for 20 to 25 min or till golden brown.

Saturday, September 7, 2013

Apple Valley Cider Stew

I thought I would post this delicious recipe now that the weather is turning cold again.  We had it the other night and its as good as I remember and chases away the chill.  This is my all time favorite stew recipe!


Today was gray and rainy, perfect cooking weather.  I baked some pumpkin gingerbread cupcakes and potato bread dinner rolls.  For dinner I decided a tummy warming stew would hit the spot.  I love cooking this delicious and hearty stew when it cold and blustery outside.  You can't taste the cider but it makes such a wonderful savory broth.  The dinner rolls (which are now a family legend and so easy to make) went perfectly with it.  Rounded out with some home canned peaches.  This easy stew can also be made in the crock pot.  Just put it all, including veggies, in at the beginning of the morning and cook on low until dinner time!

Apple Valley Cider Stew

1 Tbs all purpose flour
1 tsp allspice
1/2 tsp pepper
1/4 tsp garlic powder
1 lb. stew beef, cubed
3 tbls cooking oil
2 cups apple cider
2 tbs catsup
3 potatoes, peeled and cubed
2-3 carrots, peeled and chopped
2 stalks celery, chopped
2 onions, chopped

Optional: 1/4 cup all purpose flour

Place four and spices in a plastic zip bag and shake to combine.  Add beef to bag and shake to coat.  Heat oil in a large saucepan over medium heat and brown beef.  Drain.  Stir in cider and catsup.  Reduce heat to low: cover and simmer for one to two hours until meat is fork tender.  Add vegetables: simmer and additional half hour until tender.  If a thicker stew is desired, make a paste using 1/4 cup cooking liquid and 1/4 cup flour; stir until smooth. Slowly add to stew; cook until thickened.  Add salt to taste.  Serves 4

Recipe from: Autumn in the Country Gooseberry Patch Books

Tuesday, February 19, 2013

Best Baking Powder Biscuits

On Sunday we go to church and it tends to let out much later than our usual lunch time so I always make a substantial breakfast to get the kids through until we get home.  One essential item is homemade baking powder biscuits.  This is the best recipe I have found and they always turn out light and flaky.  The recipe comes from my always trusty Better Homes and Gardens red and white cookbook that I received at my bridal shower.  I always use butter and many times have to make triple batches to satisfy every ones craving.


Biscuits Supreme

1. Stir together 2 cups all purpose flour, 1 tablespoon baking powder, 2 teaspoons sugar, 1/2 teaspoon cream of tartar, and 1/4 teaspoon salt.  Cut in 1/2 cup butter, margarine, or shortening till mixture resembles coarse crumbs.  make a well in center.  Add 2/3 cup milk all at once, stir until moistened.


2. Turn Dough out onto a lightly floured surface and knead by gently folding and pressing dough 10 strokes or till nearly smooth.  Pat or lightly roll to 1.2 inch thickness.  Cut our with a floured 2 1/2 inch biscuit cutter.


3. Place biscuits 1 inch apart on a cookie sheet and bake in a 450 oven 10-12 minutes or till golden.  Remove and serve hot.  Make 10 biscuits.


I like the crinkle cut biscuit cutter like below


Thursday, December 27, 2012

Healthy (sort of) Country Morning Coffee Cake - A family standby


This is one of our families favorite foods for breakfast. The kids love it as does DH.  It is also a quick and easy breakfast and rounded out with milk and fruit is less expensive than store bought cereal.  Now I have to make a batch every week to keep up with the demand from my kids and husband.  We have it for snacks and for breakfast. It's probably much healthier than store bought cereals or snacks and uses up things I have tons of.

It makes a gigantic pan and lasts about  a week for us with 6 people. It is moist and fluffy and doesn't go stale as long as you wrap it up.  My children love it so much that at snack time they plead to have some.  This is a great recipe for feeding a crowd and goes well with coffee, tea, or big frosty glasses of milk.

Housewife  Tweaking:

OK you will notice that I tweak allot of recipes to suit my tastes or needs.   This recipe was originally not as healthy but I have changed it by cutting back the sugar, using applesauce as a sweetener instead, using yogurt, and using olive oil or coconut oil, putting in some whole wheat flour and wheat germ for added nutrition.   It turns out even lighter and moister in my opinion.  Also I like not just Cinnamon in the topping but nutmeg because I'm a nutmeg addict.  I do not add the nuts because all the kids hate them.

Country Morning Coffee Cake

cake

1 c. light olive oil or coconut oil (adds essential fatty acids)
1 c. sugar
1 cup no sugar added applesauce or home canned applesauce (makes a moister cake, cuts on sugar, adds fiber and fruit)
4 eggs, beaten
2 c.  plain yogurt
3 c. flour
1 c. whole wheat flour (adds fiber and is good for you)
2 tsp baking soda
2 tsp baking powder
1 tsp salt
2 tsp vanilla extract
2 tbs. wheat germ  (adds vitamin E and folic acid)


Cinnamon-nut Topping:

2/3 c. brown sugar, packed
1/2 c sugar
2 tsp cinnamon
1/2 tsp nutmeg
1/2 c. chopped pecans or almonds if you like

Use a fork to mix all ingredients together.


Combine fats, apple-sauce, sugar, eggs, and yogurt  in a large bowl.  Stir in remaining ingredients: mix thoroughly.  Pour into a greased  10x14 pan baking pan and sprinkle with the Cinnamon-nut topping.  Bake at 350 for  45 minutes or until a toothpick tests clean. Cut into squares.  Serves 18 to 20


Friday, October 21, 2011

My own original tomato recipe

I have a dark secret.  I really don't like cooked tomatoes!  That's right!  This modern day homesteader doesn't like tomato sauce, pizza, or spaghetti!  Gasp and Shock!  I have never liked them but forced myself to eat spaghetti because it was cheap and my family loves it.  Then  one day I finally admitted to myself that I just don't like the stuff.

I like fresh tomatoes fine and I have two and now up to three recipes that I really like that contain cooked tomatoes. 

The other night I had a mess of tomatoes coming to overripness but not enough to bother canning.  Rather than let them go to waste I  decided to try making them into a roasted tomato dish.  It turned out amazing with an intense tomato flavor and crunchy topping.  Even Husband liked it and all the kids at least tried it and didn't gag.  They make a good side dish for chicken.

I used:

1 cup flour
1 cup crushed balsamic sweet onion Layes chips (leftovers in the bottom of the bag)
1 cup shredded Italian cheese blend (pre shredded store bag)
a dash of McCormick perfect pinch basil and garlic spice blend

1 cup milk

about 5 ripe tomatoes

Mix all the ingredients except the milk in a medium bowl

Use milk in another bowl for dipping tomato slices in

Coat the bottom of a large baking pan with butter or light olive oil (I used the olive oil)

Preheat oven to 400 degrees


Slice tomatoes thickly and then dip in milk and then dredge in the flour mixture place in baking pan layering the tomatoes a little.  Bake about 1/2 hour or until turning brown on top. 

Sunday, June 5, 2011

A Fancy Tea Time Cake

Today I felt the urge to get into the kitchen and make something pretty.  This doesn't happen very often.  I'm more into the less attractive but eminently more satisfying home country cooking than the fussy perfect looking cooking.

But today something was in the air and I gave in to the fiddly cooking urge.  It all started with the buttermilk I had left over from making butter this morning from our jersey milk cow Buttercup's cream. This isn't like the buttermilk you get in the store at all.  This is more like a very thin milk that is the liquid leftovers after the fat solids have been removed (IE butter).  I just hate to throw good food out so I decided to make a lovely cake I got off the net here http://localfoods.about.com/od/cakes/r/buttermilkcake.htm called Buttermilk Cake.

It's very simple, makes one layer cake so is perfect for a busy weekday treat.  You can frost it, leave it plain, or top with fruit and have a slice with coffee or tea.  It turns out light with a moist crumb and looks just like in the picture on the recipe page.   I made a double batch so I could layer it this time.

I iced it with a simple vanilla butter frosting and then topped it with sweet berries.  This turned out so pretty and the kids are all impressed.  I had some blackberries and strawberries that looked  yummy in the store, and then picked some mint from the garden for a garnish.


Sometimes you just need to produce something that is special!

Saturday, March 19, 2011

Making Butter From our cows milk

So today we had enough cream to make some butter!  YAY!  I have been able to use the milk for about two days now.  Before that it was colostrum and not very appetizing.  Buttercups milk has about 3 inches of cream when it rises for about a day.  Her milk is very yellow because it is so rich.  I used the instructions from my Encyclopedia of Country Living. 

First I used my mixture until it just broke.  Then I poured it into a clean 1/2 gallon mason jar and let the kids roll it back and forth across the floor.  This worked much better than letting them shake it since there is no risk of them dropping it or getting tired.  They loved it!


After the butter had "come" I drained it and then rinsed it with cold water.


Then I worked it with two wooden spoons until all the buttermilk and water came out, rinsing occasionally with more cold water.


Done!  Look how yellow it is!  That is the natural color. I added a little salt at the end and we are going to have this with biscuits tonight.

Friday, March 4, 2011

Orange Scented Pumpkin Buns Recipe

I get most of my cookbooks first through the library, then if I really like them I buy them online.  This is how I got my cookbooks How To Be a Domestic Goddess by Nigella Lawson and Roasting by Kathy Gunst.

These were both great cookbooks and my favorite cornbread recipe (that even the children love) is in the Roasting one. 


I have just found a new book that I am going to buy online.  It's called The Everything Bread Cookbook and lives up to its name.  The recipes sound delicious, but that doesn't mean they work.  I tried the Orange Scented Pumpkin Buns and they were a success.  Very yummy, the kids each ate two at dinner and wanted more.  This is a great way to sneak in veggies if you have a child who will not eat them willingly.   I didn't add the orange zest, mainly because I don't like it personally.  And I used leftover butternut squash instead of pumpkin, but that won't change the flavor much.  One of the things I enjoyed about these was the nutmeg.  I adore nutmeg!  Please try grating it fresh because the difference in flavor is huge when you compare it to the pre-ground stuff.  Much better.  In fact I never liked nutmeg as a flavor until I tried grating my own.


I'm going to try her basic white bread, Hawaiian Bread, the caramelized onion and asiago cheese bread, and many more next.  There is a big section on whole grain breads that I want to start trying too. But on to the rolls.

I served these rolls with the best roast pork I have ever made.  I coated a cheap pork butt roast in a mix of Herbs De Provance/garlic powder/mustard powder/fresh ground pepper/cloves/salt and roasted it for about 6 hours at a very low temp with 2 cups of water a whole apple sliced, bay leaves, and half an onion.  It came out meltingly tender with a wonderful flavor.  The rolls complimented it by being a little sweet.

The rolls were tender and moist with a nice crust that formed from the egg wash brushed on top before baking.

Here's the recipe

Orange Scented Pumpkin Buns

1/4 cup water
1/4 cup sugar
1 3/4 teaspoons active dry yeast (1 package)
1/2 cup butter
1 cup pumpkin (or butternut squash) puree
2 teaspoons plus 1 pinch kosher salt
1/2 teaspoon fresh grated nutmeg
grated zest of 2 oranges
4-6 cups bread flour
1 egg

1.  In a large bowl combine water, 1 teaspoon sugar, and yeast.  Stir to dissolve and let stand about 10 minutes.

2.  Add remaining sugar, butter, pumpkin, 2 teaspoons salt, nutmeg, orange zest, and enough bread flour to great a firm dough.  (I used the mixer until the dough was about like cookie dough and then mixed in the rest of the flour until it formed a firm dough by hand with a wooden spoon)  Add flour only to reduce stickiness.  Turn out onto a floured surface and knead 8-10 minutes.  Return to bowl, dust the top with flour, and cover with a damp cloth or plastic wrap.  Rise at room temperature until doubled in volume, about 1 hour.

For the next step I just formed them into standard rolls and plopped them into buttered muffin pans.  They turned out fine!

3.  Line a baking sheet with parchment.  Turn risen dough onto a floured surface. Shape into a rope, about 3" thick.  Slice 2" pieces off the rope, then roll each into a tight ball.  Place balls on Prepared pan., seam-side down.  Dust lightly with flour, cover loosely with plastic wrap, and proof for 30 minutes.  Preheat oven to 375

4.  Mix egg with a pinch of salt and brush lightly across proofed rolls, bake until golden brown, about 20-25 minutes.  Cool completely.

We ate these still warm from the oven smeared with butter!

Tuesday, February 8, 2011

Farm Wife Harvest Day Cake Recipe


This last summer Husband ended up working as a wheat truck driver to make ends meet after he lost his job.  This was brutal work.  He worked 14 to 18 hours a day out in the dry dusty hills in 90 to 100 degree weather in an old wheat truck or harvester with no air conditioning.  He left at dawn and we didn't see him until after sundown 6 days a week.  He came home with just enough energy to eat dinner, shower, and fall into bed.

One of the benefits of harvesting was that the farmers wife still held to the tradition of providing a hearty "dinner" for the crew (which consisted of my husband, one year round farm hand, and the farmers children).  This farmer has a relatively small operation as he leased out much of his land to other farmers.  He was getting on in years, close to 80, but still loved farming.

His wife made roasts, hearty noodle dishes, and fried chicken accompanied by tons of sides and ice cold drinks. She also always provided a dessert for the famished workers.


This in fact is a tradition that has been happening since the founding of America.  Farm workers would be hired for harvest, many times just local boys, to come and bring in the bounty.  When threshing and harvesting machines first were invented over 100 years ago area farmers would get together and rent them to harvest the whole area, traveling from farm to farm until all the farmers had the harvest in.  These machines were not powered by engines but by mule teams of up to 60 animals.


These crews always knew they would be amply fed by the farm wives, and the wives often worked out a system to help lighten the load.  Many times all the women in the area would make an agreement.  The farm wife where the harvesting was happening would provide the main dishes like fried chicken, corn bread, rolls, potato and pasta salads, meat loaf, pot roast, mashed potatoes, corn, green beans, etc. (and all this in one sitting), and the other farm wives would bring out desserts.  That way it helped lighten the load somewhat for each wife.  I cannot imagine how busy a farm wife must have been not only cooking for the army of workers, but also trying to care for her own household and brood of children.  They were made of steel back then!

The work was backbreaking and dangerous with many men and boys dying or being horribly injured every year.  In fact this year a young high school boy from a nearby town ended up having his leg cut off in a harvester accident. Our church as well as probably every other church within 100 miles prayed for him.  It brought home how much risk is still involved in farming.  And since Husband is also a mechanic I knew he often helped do what repairs he could on the machinery.

One food Husband came home raving about was her Frosted Oatmeal Cake.  Now my loving man is not one to ever put himself forward with women, even family members.  He is endearingly shy with women, even though to look at him you would never think that. But he liked this cake so much that he actually asked this old farm wife for the recipe.  Unheard of!


It is one of the best cakes I have ever had, even though it is simple to make.  It turns out an unbelievably moist and tender cake of rich flavor, but the best part is the thick gooey topping.  It is rich like a pecan pie and has a wonderful texture.  The baking in the oven of the topping makes it crisp and chewy on top  with a melting in the middle.  While following her recipe I was a little doubtful when it said to put the cake back in the oven to cook the topping, but the cake is just a little underdone when you do that so it still is moist when the topping is done.

Frosted Oatmeal Cake

Cut 1 stick butter in small pieces in a large bowl.  Add 1/2 regular rolled oats and pour 1 1/2 cup boiling water.  Let stand for 30 minutes.  Add 1 cup brown sugar, 1 cup white sugar, and 2 unbeaten eggs.  Mix well.  Stir into another bowl 1 1/2 cups flour, 1 tsp soda, 1 tsp nutmeg, 1 tsp cinnamon, 1/4 tsp salt.  Add flour mixture to wet mixture and mix well.  Add 2 tsp vanilla, mix well and pour in a 9 by 13 greased pan.  Bake at 350 for 30 minutes

Frosting

1 cup brown sugar
1 1/2 cups coconut
1 unbeaten egg
1/2 cup melted butter
1 cup chopped nuts
3 tablespoons milk or cream

Mix all together and "pour' on cake as soon as baked.  Put back in oven to brown.  About 20 minutes.  Serve warm or cold.

Tuesday, October 19, 2010

Chicken N Dumplings

When my mom would make chicken and dumplings it was a red letter day for our family.  It is such a homey and comforting food,  filling the house with a heavenly scent as the chicken stewed to make the broth.  There are many forms of this dish across America with variations on the dumplings. For those readers that are not from America let me tell you this is real American food!  The way my mom made it and now I make it is with noodles and dumplings.  The chicken stews all day with bay leaves, celery, carrot, salt, and onion creating a rich broth.  The dumplings are bit and light and fluffy.  I end up making a triple batch for our family because the dumpling is every ones favorite part.  I'm going to have to start making a quadruple batch soon because there are no leftovers of dumplings for lunch the next day.  There is really nothing better on a cold fall night than this soup.

Chicken and Dumplings My Way

I mention in the following recipe additions as you like.   Depending on things in my kitchen I will add stuff here and there.  So if I have a slice of stale bread I add it to thicken and enrich the broth.  You can't tell its there and it uses something that might go to waste.  I do this allot. Also this makes lots of soup, enough to feed 6 people and have leftovers.  You can easily change the proportions to fit your personal needs or tastes.  So if you don't like peas don't add them!

Take one stewing chicken (or another way is to take the carcass of a chicken you roasted the day before with the meat removed and saved for the soup and then add the back pieces from cut up chickens that you saved and froze to make broth.  I always save the back from cut up fryer packages in the store and throw them in a freezer bag until I have enough pieces to make broth with)

Put the chicken into a large stock pot with 8 cups water, 2 tbls salt, two stalks celery, 1 peeled carrot, 2 bay leaves, a good grinding pepper, and a whole onion cut in half.  Extra additions if you like - a cut up ripe tomato or 2 tbls canned diced tomatoes, garlic, a slice stale bread  Also this works fine in a large crock pot on low all day.
 

Simmer on low for 4 to 6 hours or more till chicken falls off the bone.

Remove chicken and veggies and allow to cool on a plate.  Then discard the veggies (or feed to your pigs) and debone the chicken of all meat.  Put back in the broth

In broth add - 2 or 3 carrots peeled and diced, 2 stalks celery sliced, 1 cup corn, 1 cup frozen peas, season to taste with salt or if too salty add a little milk, 2 to 3 cups noodles (more noodles for more people)


Bring to a simmer

Now get on with the dumplings.  My recipe comes from my Better Homes and Gardens red and white cookbook.

Dumplings for stew:

Combine 2/3 cup all purpose flour, 1 teaspoon baking powder, 1/8 teaspoon salt.  ( you can also add dried or fresh herbs to this but I never do)  Combine 1/4 cup milk and 2 tablespoons cooking oil in a separate bowl, pour into flour mixture.  Stir till just combined.  Drop by spoon fulls into slightly simmering broth, too high of a boil makes your dumplings fall apart.  Cover and simmer 10 min or until a wooden toothpick inserted into dumpling comes out clean.  I triple this recipe and it works just fine.


Dish into bowls and let cool for a few minutes, then enjoy!